Following info is adapted from here. Another site with a similar instruction. If you do not have the software and drivers, a vender from amazon provides a link for download.
TIS Techstream V10 Setup Instruction ( !!! for 64 bit system !!! ) :
- The Techstream version 12* and above should be compatible with Windows 10 64 bit system.
- Installed and follow through instruction.
- Start Techstream and input Area, then shutdown
- copy Mainmenu.exe in Bin folder under installation folder.
- start Techstream and input registration code.
- unzip the MCVIDriver.msi, move the contents under “C:\Program Files (x86)\XHorse Electronics\MVCI Driver for TOYOTA TIS”.
- plug in mini VCI cable.
- Open the Device Manager the device should be loaded. If not, right click each failing device, select Install Driver, then ”Browse my Computer” and locate to “C:\Program Files (x86)\XHorse Electronics\MVCI Driver for TOYOTA TIS” (enable the ”include subfolders” flag). Click ”Next” and wait until drivers are installed. You should now see two new devices: ”Universal Serial Bus Controllers\USB Serial Converte” and ”Ports (COM & LPT)\USB Serial Port (COMx)”.
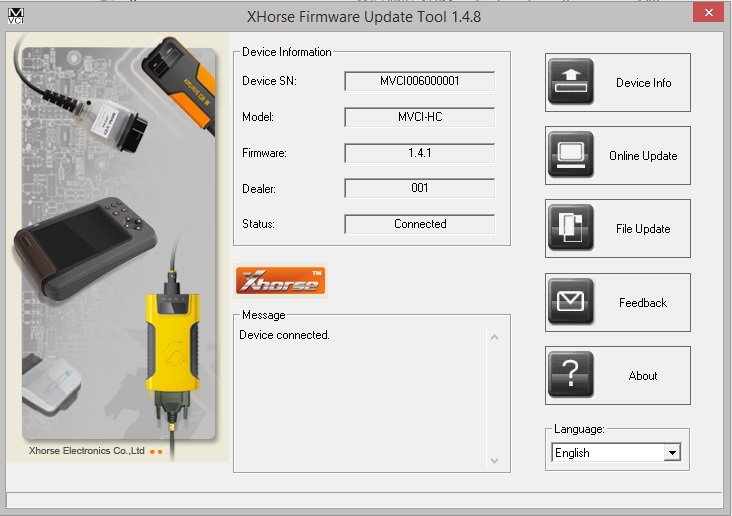
- Run the FirmwareUpdateTool.exe from the “C:\Program Files (x86)\XHorse Electronics\MVCI Driver for TOYOTA TIS”. Click ”Device Info”, You should see the ”Device connected” screen.
- Now install Techstream software using “Techstream_Setup_V12…exe” on our software CD
-
Software Registration: copy the two *.ini files in ”Registration” folder to “C:\Program Files (x86)\Toyota Diagnostics\Techstream\Env\
Attention: It’s C:\Program Files (x86) not C:\Program Files\ , BIG DIFFERENCE !!!
- Registry Hack: Run the mvci-64bit.reg file (here for download) to modify the registry for Techstream to recognize MINI-VCI under Windows x64
- Run Techstream software. Go to Setup | VIM Select menu and select the ”XHorse — MVCI”
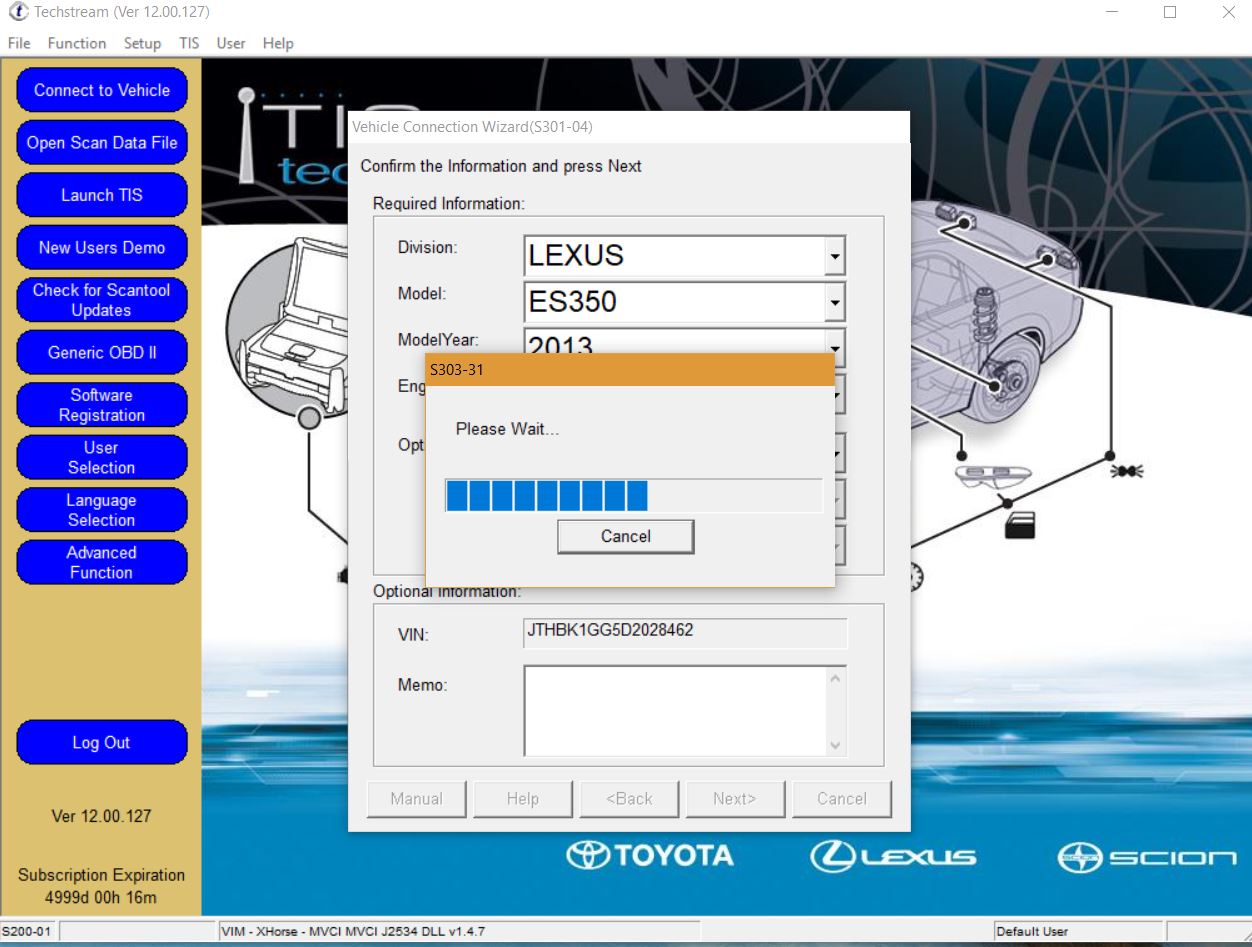
- Connect Mini VCI cable to your car‘s OBDII interface, turn ignition on, then click ”Connect to Vehicle” in Techstream. Wait. Then wait again. If everything works, you will be prompted to confirm car year/model after which you’ll get to the diagnostic interface.
Important Note:
- DO NOT change the “User Type” when you will run your TIS Techstream for 1st time! LEAVE IT with the Default option! “Official” Dealer/Repairer with other words…
- in [ VIM Select ] option, please select the [ Xhorse — MVCI ], not [ TIS Techstream VIM ]
- If you get the following reminder while using the program:
— — — — — — — — — — — — — — — — — — — — — –
Register Techstream Software (S314–03)
Network connection is unavailable. A network connection is required to use Techstream software.
You can only connect 29 more times without a network connection before software registration is required.
— — — — — — — — — — — — — — — — — — — — —
You can reset that as following steps:
Go to C:\Program Files\Toyota Diagnostics\Techstream\Env and find ”IT3usercustom.ini” file and look for ”Connectioncount=1” or what ever number of times you tried and just delete ”connectioncount=1”. Click save and you should be reseted back to 30
ShareJAN
About the Author:
Beyond 8 hours - Computer, Sports, Family...