Arduino Interrupts and some of its Usage
Background and rational
In the process of developing a device, we come across a situation that we needed a responsive way to abort the device; However Arduino will be stuck in the middle of loop and only response after that, esp when the only communication to Arduino is via a serial port. We have adapted a very wasteful way of putting the whole protocol into another for loop and check if there is a abort command from serial stream, every second. This does the job. After some research and playaround, it is clear that interrupt is the way to go. The interrupt is like a asynchronous wake up call from the hotel from desktop. In stead of waking up every so often check the time, have a peaceful sleep and get up upon receiving your wakeup call.
The Definition
-from wikipedia:
An interrupt is a signal to the processor emitted by hardware or software indicating an event that needs immediate attention. An interrupt alerts the processor to a high-priority condition requiring the interruption of the current code the processor is executing.
Most Arduino boards have two external interrupts: numbers 0 [INT0 on digital pin 2] and 1 [INT1 on digital pin 3]; Mega and some other boards have 4 additional as shown in following table.
| Board | int.0 | int.1 | int.2 | int.3 | int.4 | int.5 |
|---|---|---|---|---|---|---|
| Uno, Ethernet | 2 | 3 | ||||
| Mega2560 | 2 | 3 | 21 | 20 | 19 | 18 |
| Leonardo | 3 | 2 | 0 | 1 | 7 |
Note: It is obvious that the pin you use for interrupt will not be available for other purpose.
The Schematic and Sketch
Following is a very simple example demonstrate the usefulness of interrupt -which solved my problem.
-
Start with a Fritzing schematic
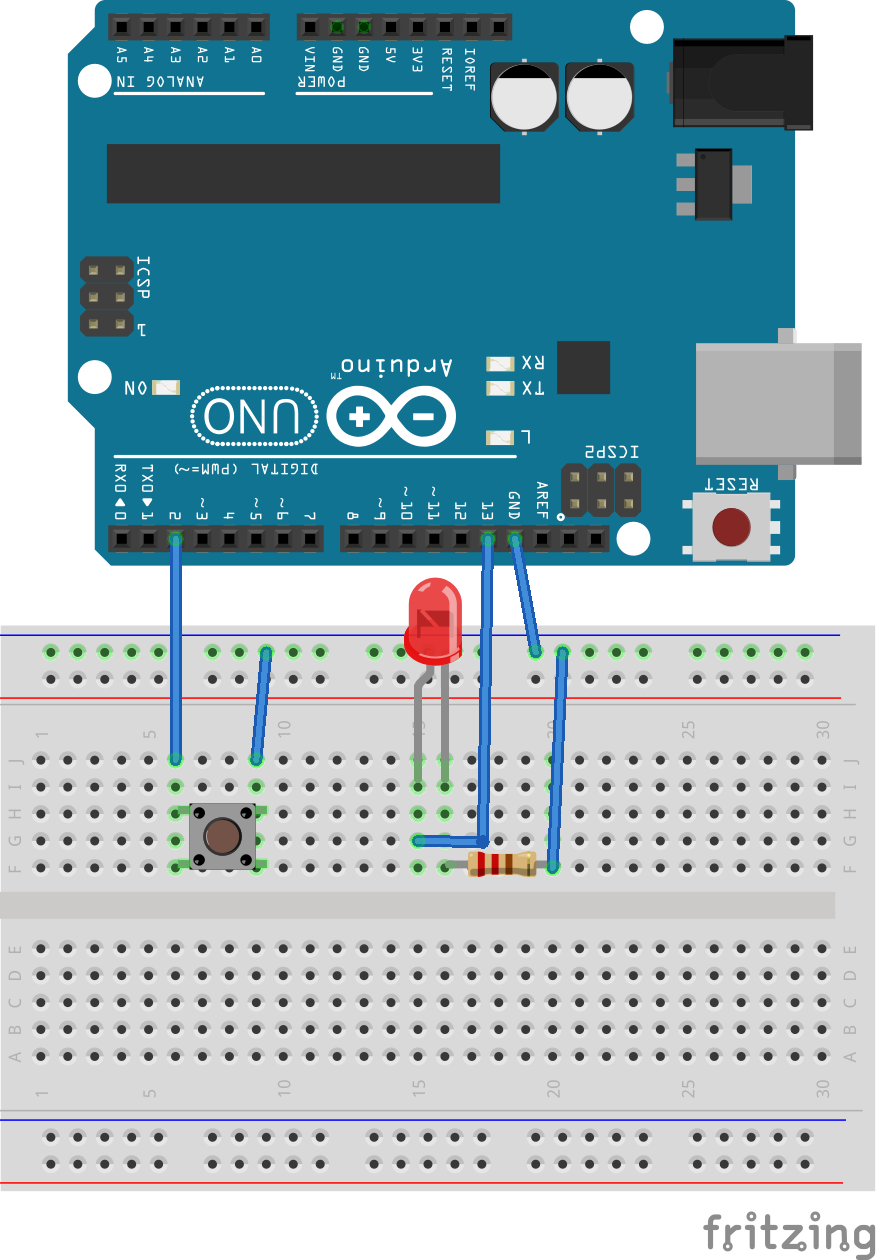
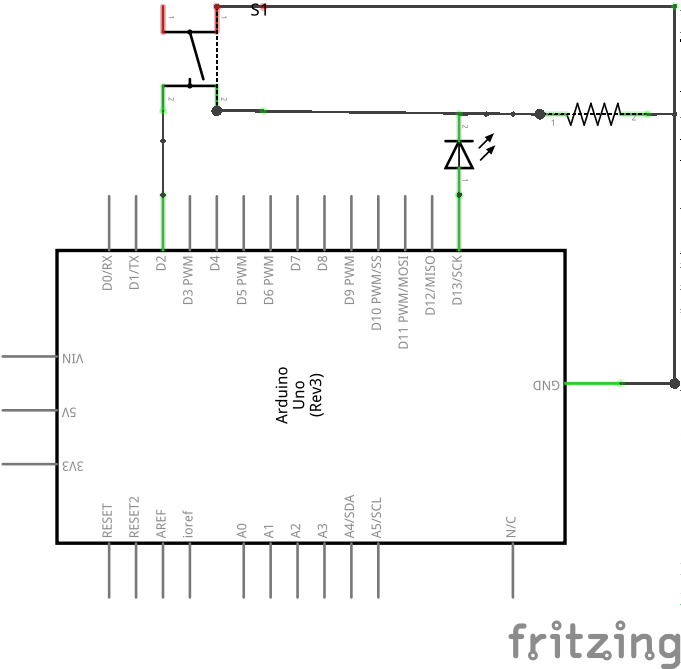
-
Here is the sketch code
12345678910111213141516171819202122232425262728293031323334353637383940414243444546474849505152535455565758#include <avr/wdt.h>int incomingByte = 0;int ledPin =13;void setup(){pinMode(ledPin, OUTPUT);pinMode(2, INPUT);digitalWrite(2, HIGH);attachInterrupt(0, software_Reboot, LOW); // Attaching the ISR to INT0Serial.begin(9600); // opens serial port, sets data rate to 9600 bpsSerial.println("printed from setup");}void software_Reboot(){Serial.println("printed from soft_reboot");wdt_enable(WDTO_15MS);while(1){ //do nothing}}void software_Reset() // Restarts program from beginning but does not reset the peripherals and registers{Serial.println("printed from soft_Reset");asm volatile (" jmp 0");}void blink(){for(int i=1;i<=5;i++){digitalWrite(ledPin,HIGH);delay(1000);digitalWrite(ledPin,LOW);delay(1000);}Serial.println("printed from blink");}void loop(){// send data only when you receive data:if (Serial.available() > 0){// read the incoming byte:incomingByte = Serial.read();// say what you got:Serial.print("Arduino received: ");Serial.println(incomingByte, DEC);if (incomingByte == 's'){blink();} //for lower case sif (incomingByte == 'x'){software_Reboot();} //for lower case x}}All it does is to wait for a “s” from serial input and the led pin 13 blinks for 5 times. You can do this via hyperterminal, python pyserial, or simply Arduino serial Monitor. As you can see, the blinking can not be stopped in the middle of the loop (5 blink) when you try to send ‘x’. When you press the button – the intterupt way, the blinking is aborted right way. The watchdog is set at 15ms [ wdt_enable(WDTO_15MS);] in these case. If you set as 8s, you will notice that the board will reset 8sec after you press the button.
The 3rd way to reset the Arduino by code (see link here).
Above sketch lists 2 ways to reset the Arduino, there is one more base on link above, that is,to directly set the reset pin to LOW either via another pin on your Arduino board. Did not try it myself, there are more info at this link.
All roads leads to Rome.
Obviously, you can define whatever code you want in your function linked to your interrupt. I needed a reset to stopped all the peripherals. Following is using sleep and wakeup to interrupt Arduino (see more here). I hope I can figure out a way to do the wakeup and sleep alternately -then this will be a more elegant way.
|
1 2 3 4 5 6 7 8 9 10 11 12 13 14 15 16 17 18 19 20 21 22 23 24 25 26 27 28 29 30 31 32 33 34 35 36 37 38 39 |
#include <avr/sleep.h> int wakePin = 2; // pin used for waking up int led=13; void wakeUpNow() { // execute code here after wake-up before returning to the loop() function // timers and code using timers (serial.print and more...) will not work here. // we don't really need to execute any special functions here, since we // just want the thing to wake up } void setup() { pinMode(wakePin, INPUT_PULLUP); pinMode(led, OUTPUT); attachInterrupt(0, wakeUpNow, LOW); // use interrupt 0 (pin 2) and run function wakeUpNow when pin 2 gets LOW } void sleepNow() { set_sleep_mode(SLEEP_MODE_PWR_DOWN); // sleep mode is set here sleep_enable(); // enables the sleep bit in the mcucr register attachInterrupt(0,wakeUpNow, LOW); // use interrupt 0 (pin 2) and run function sleep_mode(); // here the device is actually put to sleep!! // THE PROGRAM CONTINUES FROM HERE AFTER WAKING UP sleep_disable(); // first thing after waking from sleep: disable sleep... detachInterrupt(0); // disables interrupt 0 on pin 2 so the wakeUpNow code will not be executed during normal running time. } void loop() { digitalWrite(led, HIGH); delay(1000); digitalWrite(led, LOW); sleepNow(); // sleep function called here } |
Some other ways of using interrupts.
The interrupt can also be used to excute any functions outside loop as shown in this link, and I am sure that I am just barely scratching the surface.
|
1 2 3 4 5 6 7 8 9 10 11 12 13 14 15 16 17 18 19 20 21 22 23 24 25 26 27 28 29 30 |
int pin = 10; volatile int state = LOW; void setup() { pinMode(pin, OUTPUT); digitalWrite(2, HIGH); attachInterrupt(0, toggle, FALLING); // Attaching the ISR to INT0 } void loop() { // Does Nothing } // Interrupt Service Routine void toggle() { if(state == LOW) { state = HIGH; } else { state = LOW; } digitalWrite(pin, state); } |
JUN
About the Author:
Beyond 8 hours - Computer, Sports, Family...