Preamable
This was the very first project RLM, Limdo and I did about a few month ago – a very simple project which covers the whole nine yards of internet of things, from basic concept to final implementation. I have been so intrigued by the wonder of electronics and programming world ever since.
The task of this project is to: 1) use Arduino to control 13 LEDs for a digit display, 2) and remotely control it from web.
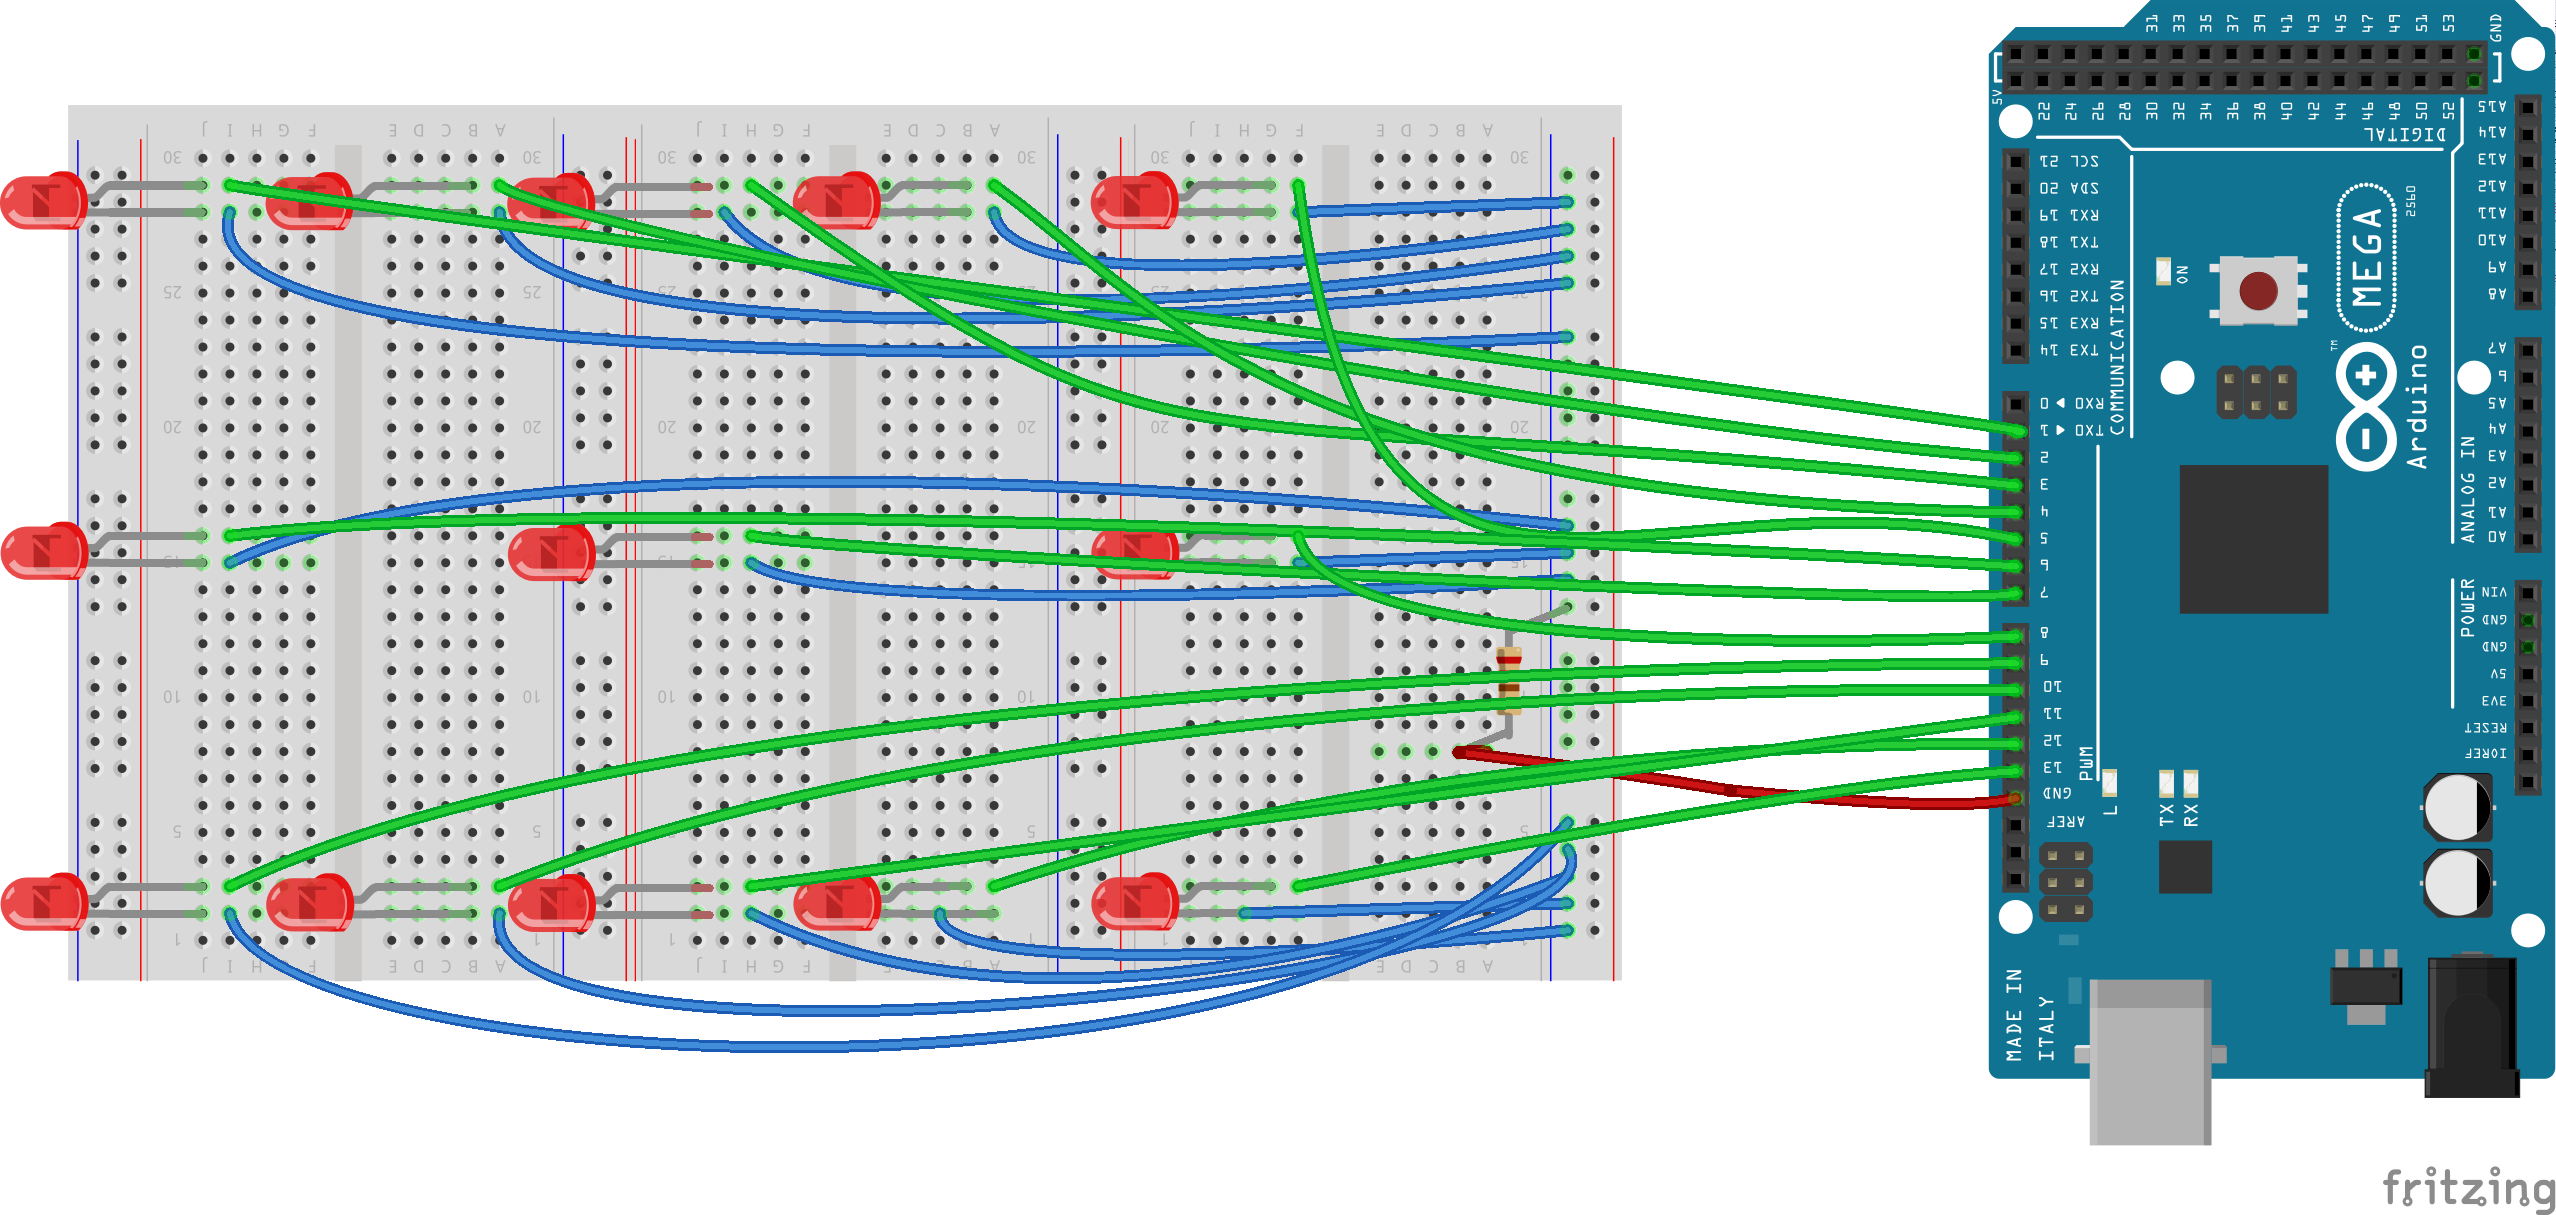
The Arduino Sketch Code and LED Digit Display Wiring
First the wiring and Fritzing Drawing:

We were using just one resistor for all 13 LEDs, ideally each LED should coupled with one discrete resistor.
and, the arduino sketch code is following:
|
1 2 3 4 5 6 7 8 9 10 11 12 13 14 15 16 17 18 19 20 21 22 23 24 25 26 27 28 29 30 31 32 33 34 35 36 37 38 39 40 41 42 43 44 45 46 47 48 49 50 51 52 53 54 55 56 57 58 59 60 61 62 63 64 65 66 67 68 69 70 71 72 73 |
void set_display (int L1, int L2, int L3, int L4, int L5, int L6, int L7, int L8, int L9, int L10, int L11, int L12, int L13){ digitalWrite(3, L1 ? HIGH : LOW); digitalWrite(2, L2 ? HIGH : LOW); digitalWrite(1, L3 ? HIGH : LOW); digitalWrite(4, L4 ? HIGH : LOW); // upto 13 } void clear_all () { for (int i=1; i<=13; i++){ digitalWrite(i,LOW); } } void zero() { // 1 2 3 4 5 6 7 8 9 10 11 12 13 set_display( 1, 1, 1, 1, 1, 1, 0, 1, 1, 1, 1, 1, 1); } void one() { // 1 2 3 4 5 6 7 8 9 10 11 12 13 set_display( 0, 0, 1, 0, 1, 0, 0, 1, 0, 1, 0, 0, 1); } void two() { // 1 2 3 4 5 6 7 8 9 10 11 12 13 set_display( 1, 1, 1, 0, 1, 1, 1, 1, 1, 0, 1, 1, 1); } //rest 3 -9 void clear_delay(int d){ delay(d); clear_all(); } int incomingByte = 0; // for incoming serial data void setup() { for(int i=1; i<=13; i++){ pinMode(i, OUTPUT); } Serial.begin(9600); // opens serial port, sets data rate to 9600 bps void loop() { // send data only when you receive data: if (Serial.available() > 0) { // read the incoming byte: incomingByte = Serial.read(); // say what you got: Serial.print("I received: "); // Decimal is the default format for Serial.print() and Serial.println() Serial.println(incomingByte, DEC); clear_all(); if (incomingByte == 48){zero();} //== '1' would be same if (incomingByte == 49){one();} if (incomingByte == 50){two();} if (incomingByte == 51){three();} if (incomingByte == 52){four();} if (incomingByte == 53){five();} if (incomingByte == 54){six();} if (incomingByte == 55){seven();} if (incomingByte == 56){eight();} if (incomingByte == 57){nine();} } } |
At this point, you should be able to control the digit display from Serial Monitor or a python script as following:
|
1 2 3 4 5 6 7 |
#!/bin/python import sys import serial ser = serial.Serial('/dev/ttyACM0', 9600) ser.write(sys.argv[1].encode()); |
The Python CGI Script to Control Arduino (Python Serial Needed!)
You will need to setup python CGI in Apache or Httpd webserver for this to work. This was tested in both cases. RLM did this via perl CGI intially , see his post here.
|
1 2 3 4 5 6 7 8 9 10 11 12 13 14 15 16 17 18 19 20 21 22 23 |
#!/usr/bin/env python import cgi form = cgi.FieldStorage() digit = form.getvalue('display') #working approach to retrieve import sys import serial import time ser =serial.Serial('/dev/ttyACM0',9600) # Must given Arduino time to rest. time.sleep(1.5) ser.write(digit) print "Content-type:text/html\r\n\r\n" print '<html>' print '<head>' print '<title>Hello Word - First CGI Program</title>' print '</head>' print '<body>' print "<h4 style='color:green;text-align:center;'>The digit you chosen to display is: %s</h4>" % digit print '</body>' print '</html>' |
The Website
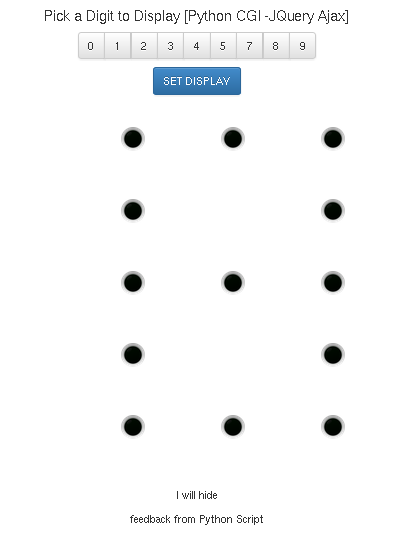
This is a over-kill for the proof of concept purpose. I got carried away by jQuery and ajax. Following is what it looks like.

As shown above, the radio button on top pick the 9 digit of choice, the selection was passed to Arduino via ( POST method) Python Script triggered by Set Display button click.
|
1 2 3 4 5 6 7 8 9 10 |
<form action="http://localhost/cgi-bin/python/serial-send-cgi.py" method="POST"> <div id="radiobtn" class="btn-group" data-toggle="buttons"> <label class="btn btn-default"> <input type="radio" name="display" value="0" /> 0 </label> <label class="btn btn-default"> <input type="radio" name="display" value="1" /> 1 </label> |
Up to this point, the purpose of this project is fully accomplished. I went a step further to add a visual display of the LED digit just for fun, which is shown in lower part of the web site.
The html body:
|
1 2 3 4 5 6 7 |
<div class="row center-block"> <div class="col-sm-1 col-sm-push-5 off" id="1" ></div> <div class="col-sm-1 col-sm-push-6 off" id="2" ></div> <div class="col-sm-1 col-sm-push-7 off" id="3" ></div> </div> |
The jQuery javascript and ajax section. Note that ajax is needed in order to post html feedback back to parent page #p1 or it will be directed to a new page.
|
1 2 3 4 5 6 7 8 9 10 11 12 13 14 15 16 17 18 19 20 21 22 23 24 25 26 27 28 29 30 31 32 |
<script> $(document).ready(function(){ $("#radiobtn input[name='display']").click(function() { var digit = parseInt($("input:radio[name=display]:checked").val()); //values are string alert("test"+digit); }); $("#submitbtn").click(function(){ $.ajax({ type: "POST", url: "http://localhost/cgi-bin/python/serial-send-cgi.py", /* http://stackoverflow.com/questions/986120/how-to-get-the-value-of-a-selected-radio-button-using-its-name */ data: {display: $('input:radio[name=display]:checked').val()}, /* url: "http://localhost/cgi-bin/ajax-testing.py", */ success: function(html) { $("#test").hide(); var digit = parseInt($("input:radio[name=display]:checked").val()); //values are string /* alert , for prompt, + for alert to concatent */ alert("You have chosen:"+ digit); /* $("input:radio[name=display]:checked").before(before(toggleClass("red"))); */ $("#p1").empty(); $("#p1").append(html); switch(digit){ case 0: $('#1, #2,#3,#4,#5,#6,#7,#8,#9,#10,#11,#12,#13').removeClass("on"); $('#1, #2,#3,#4,#5,#6,#8,#9,#10,#11,#12,#13').toggleClass("on"); break; case 1: $('#1, #2,#3,#4,#5,#6,#7,#8,#9,#10,#11,#12,#13').removeClass("on"); $('#1, #4,#6,#9,#11').toggleClass("on"); break; |
plus some css styling:
|
1 2 3 4 5 6 7 8 9 10 11 12 13 14 15 16 17 18 19 20 21 22 23 24 25 26 27 28 29 30 31 32 33 34 35 |
<style> .red{ color:red; } .off{ background-image: url("http://localhost/images/black-led-off.png"); background-size: 30px 30px; width:30px; height:30px; background-repeat:no-repeat; display:block; } .on{ background-image: url("http://localhost/images/red-led-on.png"); background-size: 30px 30px; width:30px; height:30px; background-repeat:no-repeat; display:block; } .blank{ width:30px; height:30px; display:block; } .center-block{ float: none !important; display: block; margin-left: auto; margin-right: auto; text-align: center; //required to center } </style> |
See the video recording from RLM post.
DEC

About the Author:
Beyond 8 hours - Computer, Sports, Family...